8 Hints to Add Vertical Shiplap
Adding shiplap to your walls is very popular right now and adds that extra bit of texture to enhance your design.
The shiplap planks, add dimension to a wall that is blank giving a simple but sleek look. Depending on your use, placing the shiplap vertically will complement the height of the room.

What is shiplap?
First off, what is shiplap? Shiplap is characterized as a wood wall composed of long planks. The planks are mounted horizontally with gaps in between them, hence this is called a shiplap. This design evokes the feeling of exterior shiplap walls. It can also be defined as a traditional building material type used for building barns and sheds.
Recently, it has grown to be popular, with many people embracing the design. From adding it to an accent wall in the living room, kitchen floors or backsplashes or to bedroom. When paired with the right furniture it will give birth to an elegant and rather charming look.
The shiplap is made up of ordinary wood, but it can be made more exquisite when made of mahogany, cedar or even cherry. With the current diminishing of natural resources in the wild, these woods have become a treasure indeed.
VERTICAL SHIPLAP DESIGNS
1. Cover the Entire Room:
Designed by Ashe & Leandro

2. Accent Wall in Bathroom

Using a shiplap entirely in the room to design maybe overwhelming, but the interior designers have come up with ways to ensure we have a touch of shiplap in the room.
You can decide to have a bathroom which is light grey in color, with the wall styled with shiplap. This type of theme will bring to space a coastal look, and with a blend of the dark painted door, this is the perfect design for your bathroom. You can add some highlight with glossy and bright bathroom accessories.
3. Add a Little Flare to your Hallway

Image by James F Carter.
The entryway of your home sets the first impression. Adding shiplap can be an easy solution to add dimension to the walls of your entryway. This look helps to add a richness to the walls.

Designed by Ashe & Leandro.
To add some light to this blue space, Ashe & Leandro used a 3/4 shiplap technique. Leaving the white space at the top of the wall adds extra lightness to this hallway.
5. Accent Wall in Kitchen
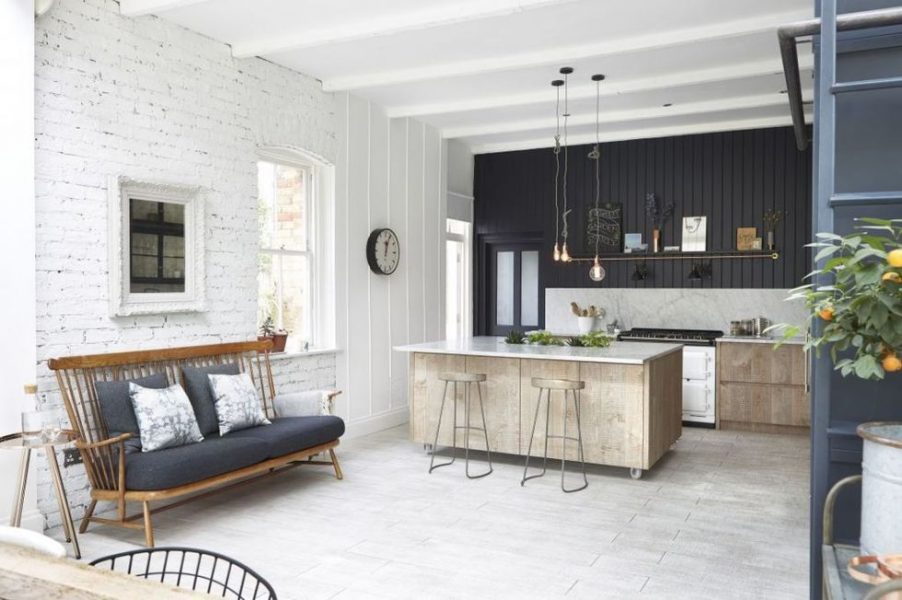
Via JJ Media
The walls in the kitchen above are filled with texture, from brick to shiplap. Adding the black shiplap above the kitchen backsplash helps to tie the kitchen in with the rest of the space. In addition, it adds that extra rich look.

Designed by Ashe & Leandro
The shiplap in the above kitchen designed by Ashe & Leandro blends this wall into the space. Imagine the shiplap was not on this wall, the wall would be very flat and would attract the attention of the eye more. Adding the shiplap enable the eye to continue to wander around the space from line to line.
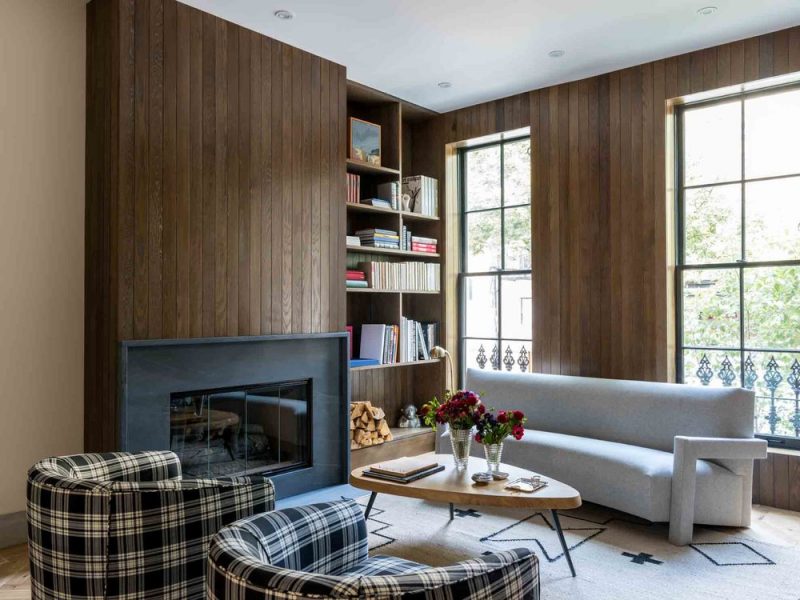
6. Fireplace Accent Wall
Designed by Ashe & Leandro.
Again, Design team Ashe & Leandro have used shiplap in the design above to successfully bring in the bookshelf and fireplace wall with the rest of the space. The thin wood shiplap also adds a sense of class to this gorgeous design.
7. Shiplap Ceiling

Designed by Ashe & Leandro.
Beams are a wonderful addition to break up a flat ceiling, however, there can be a great contrast between each beam. In the design above the shiplap on the ceiling adds detail for the eye to help to match with the texture of the brick fireplace and lead the eye to the fireplace focal point.
8. Shiplap Bedroom

By JJ Media
Adding vertical shiplap to your bedroom can create a wonderful effect behind your bed. This shiplap can act as the headboard and saves you from having to really design that wall behind your bed.
Hire a designer? Or DIY!
At Roomhints we always recommend hiring a designer, but if you do want to give it a try on your own. We love this video guide.
Basics for using shiplap for interior designing
To install shiplap, you will need great tools. This is because there will be a lot of fitting that will be required during the whole process. A miter saw and miter box will come in hand. Other equivalent modern technology can also come in handy in this case.
Supplies Used In This Video:
• 1/8″ Plywood – $10/sheet – http://www.homedepot.com/p/Utility-Pa…
• DeWalt Compound Mitre Saw – $450 – https://amzn.to/2IN3kNP (any saw will do for this project, honestly)
• Stud Finder – $50 – This one is better than the one I use here 🙂 – https://amzn.to/2GRusZQ
• Purdy Cut-In 3″ Brush – $15 – https://amzn.to/2J1UdrX
• Big Stretch Caulking – $6 – https://amzn.to/2IYEmKK
• DAP Putty – $4 – https://amzn.to/2LdTFC7
• Hyde 1 1/2″ Putty Knife – $6 – https://amzn.to/2DF9CLj
• DeWalt Spade Drill Bits – $9 – https://amzn.to/2GQLDKZ
1. Purchase the board
At your local hardware store, get plywood which is a 1/8th inch. The plywood is usually 4feet by 8feet. You can get this cut at the store into 8th strips which are the required size for the wall shiplap. But if you have a table saw you can cut it into 8inches strips by yourself. One thing to note, try to ensure the plywood can be cut into 8inches strips at the store first before purchasing.
2. Prepare the plywood for installation onto the wall
After the plywood has been cut into 8inches strips, use low-grade sandpaper, to grind the edges and make them smooth with splinter free. This gives the shiplap a finer touch on the edges once installed.
3. Prepare the wall you will work on
Once through with preparing the plywood, it’s time to prepare the wall you are going to use for shiplap. You can begin by removing any wall accessories. This includes switch covers, wall sockets, light fixtures, and mirrors. In other words, the wall should be clear.
When dealing with electrical appliances on the wall, such as, sockets or light switch covers, ensure you have powered them off at the circuit breaker box before beginning.
4. Stud finding
When you are through with preparation of the wall, you can use a stud finder to locate all studs on the wall. Just to be sure where they are when installing the shiplap, you can mark the wall with a pencil to keep track.
5. Determine the spacing of the planks
To get the planks on the wall, you need them to have equal spacing for uniformity. To handle this, you can use two coins taped together for even spacing. After that, it’s now time to put the planks together on the wall.
6. Time to fix the planks on the wall
If your wall is more than 8feet long, you can fix the plank from one end, and cut a small piece to finish up the remaining gap. To hold tight the shiplap planks on the wall you can use 1.5 inch or 2inch brads, placing 2 to 3 each of them on the studs.
If you encounter a wall with doors windows or any form casing it, you will have to cut custom pieces. These pieces should fit accurately around the casings or frames; to give the shiplap planks a finer look. To do this, take your measurements, and mark them on the wood, using a jigsaw cut out accurately along the measurements.
With your first board fixed well, you are ready for the second one. And this is where leaving space is important. At this point make use your coins for even spacing, then into the studs drive two or three brads. But remember to counter check the spacing, to ensure uniformity from top to bottom.
Until you are through with the wall, continue taking the measurement for each space you are going to put the board, using the table saw for cutting across the boards. Meanwhile, it will be all about measurements, cutting and fixing until you are done with the wall.
But if you encounter a point where the board covers a switch or an outlet, you can use a drill bit with a larger diameter, to drill through the board and make a hole. Then using a jigsaw, you can cut out an opening for the outlet.
7. Giving the planks a finer touch
When you are through with fixing the shiplap planks, you can go over the edges using sandpaper and ensuring it is splint free. In addition, tap down all the nails and ensure they are not sticking out. Then using putty, you can seal the holes and any cracks on the board to ensure it has a smooth finishing.
8. Painting the shiplap
After that, the wall is ready for paint. You can use more paint and brush to ensure the paints get in between the spaces. The choice of color depends on your taste or the theme of the house.
To complete a shiplap fixing, the time may depend on the size of the wall, shape, and complexity.
Conclusion
Shiplap is an inexpensive but gorgeous way to add a sleek look to a blank wall. It uses fewer resources than other methods and the outcome is marvelous. Apart from bringing the taste and beauty to your house, shiplap can come in handy during winter as it is a great insulation material. So don’t live in an ordinary house, use shiplap interior design and have an extraordinary home.